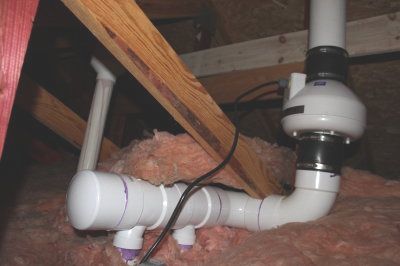
Once you know that radon gas exists, that it can be dangerous to your health and that of your family, and could quite possibly be seeping from the ground beneath your house and into your property, you need to take action. The most basic step is to have a radon mitigation system installed in your home. You have two possibilities in this situation.
- You can employ a professional contractor or
- You can do it yourself
This article is about the second option.
DIY
Of course if you have few if any skills in home maintenance then tackling this important task is not an option. But if you are a keen and talented DIY person, then provided you follow the steps as outlined in this article, there is no reason why you can’t install your own radon gas mitigation system. Remember that radon gas can have serious health ramifications so doing the right thing with your prevention routine is important.
What you are basically doing is collecting or vacuuming the radon gas beneath your home and having collected it, sending it out above your home using a radon fan. So the first step is to know the structure of your home. How old is it? What condition is it in? These things are important because if you are going to drill through a concrete slab or your foundation and then into your roof, you need to know the age and stability of your property.
What are the steps?
Get your first reading of random gas. You need a detector to know the level of random gas beneath your property. The test should be thorough. This means you will take regular readings over say 48 hours. A one-off short test will not suffice. Give yourself the best chance of knowing the true situation.
Has your house had an extension or extensions? If so you will need to test for radon gas under each of these new buildings. Check the soil beneath and around your house. What is its condition? What is the condition of the space around pipes which come into your property? Remember finding the radon gas and its entry points are crucial to your mitigation system.
What about the pipe?
Remember that you are taking the radon gas from beneath your home and sending it via a pipe or pipes out through your roof where it goes into the atmosphere and dissipates. The recommended PVC pipe will be about 3 to 4 inches in diameter.
Now you don’t want to have a pipe running through your kitchen or living room if for no other reason than it looks terrible. Don’t put the outlet of the pipe anywhere near a window. You might be able to suck up the gas and send it out through your pipe system only for it to sneak back inside your house via a nearby window.
The random fan is so important
Remember that it is the fan which propels the random gas away from your property. (Here are some best radon fans in the industry)Make sure that it is the right quality, is well-maintained, and does not have any possibility of a leak.

You will probably need some drilling equipment and unless you already own these tools, hiring is probably the best option. The pipe from your roof to your basement with the fan at the top end is the key to your success. The recommendation is that you have the outlets in somewhere like a garage or an attic – away from a living room and window.
Sealing is everything
If you go to the time and trouble and expense of being a DIY expert with your random mitigation system, it would be crazy to not properly seal the pipe at both ends. You will use hydraulic cement to effectively seal your pipe. And of course, having installed your random gas mitigation system, you will need to test it. Make sure your system is sucking air from beneath your site and that the air is being expelled successfully into the atmosphere. Constant testing and maintenance is essential.


